Planning must take priority when struggling to survive. While foraging, fishing, and hunting are all significant activities, they demand a lot of attention and effort. You can perform several tasks by using traps and snares. You may focus on your shelter, fire, or rescue while the trap does the hunting for you.
In this article, I’ll describe how to make a quick and reliable crawfish trap. It shouldn’t cost you anything and only takes a few minutes to construct. It also actually works. You’ll have some freshwater lobster at the end of the day, and you might not want to be retrieved.
Equipment required
These are the following types of equipment required to make a crawfish trap.
-
Hardware cloth
-
Measurement tape
-
Wire cutters
-
Working gloves
-
Zip ties
-
Two rubber bands
-
Sturdy rope or string
-
6-inch long chain
-
Sharp-nosed pliers
Step 1: Structure
-
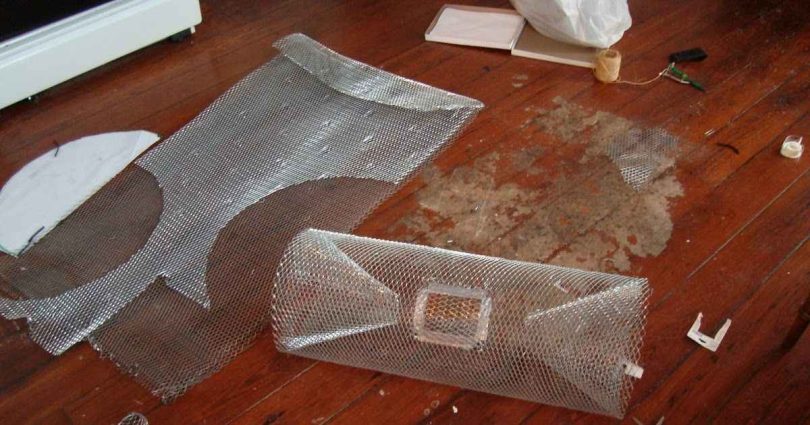
With the measuring tape, measure out 27 inches of hardware cloth. Cut away the portion of cloth nearest to the lateral wire that runs at 27 inches. You should cut it such that the cut-out section’s edge is smooth. It will measure 24 x 27 inches.
-
Create a cylinder by rolling it up lengthwise.
-
Next, zip ties the sides together by overlapping the wire with two or three squares. Make sure the zip ties’ ends are clipped off quickly. If you don’t zip it up so the ties’ ends fall out, the following stages won’t go as smoothly. For the cylinder to stay together while you zip, it is advised that the two ends be zipped together first.
Step 2: Corners of Trap
-
After creating a long cylinder, cut two additional pieces of hardware cloth such that they are 21 squares by 21 squares each. These will make up the cylinder’s ends.
-
The next action is to shape each piece into a cone. You can use a marker to make an X in the center of each piece to determine its shape as a cone. Cut from an edge to the middle. One end will be pulled over the other to create the “cone” shape and continued to pull, tightening it.
-
After that, insert the cone into the cylinder’s end, being sure to leave a 3-inch gap at the tip. When the cone is in the correct shape, you can use zip ties to hold it in place and trim the zip ties’ ends.
-
The cone’s tip will be removed, leaving a hole measuring 2 1/2 inches in diameter.
Step 3: Attach Corners to Body
-
Zipper ties will require to tie the cone into the cylinder’s end. With the edges aligned, insert your new cone into the cylinder’s one end. This will be the trap’s final and unbreakable point.
-
After zipping the cone in the four cardinal directions, continue zipping every six rows. Once finished, trim the ties’ edges. The extra wire from the side piece is cut off to fit flush with the cone to complete this end.
-
The hole from where the crawfish will enter can be seen by looking through the side. The crawfish will be able to enter but not exit through it.
-
The same process will then be repeated on the opposite side of the trap. Similar to how you did with the first cone, attach the second cone to the opposite end of the cylinder to complete the other side. Cut off pointed edges flush with the cylinder.
-
To avoid being poked by wires while making or handling the trap, make sure the smooth ends of the wire are on the side you are using.
Step 4: Door
-
You needed a door to get the crawfish out, so cut a hole through the middle of the trap. The size of the hole will be 9 by 8 squares.
-
Then created a door just a little bit bigger than the hole. The door’s dimensions will be 10 x 11 squares. The door’s sides neatly covered the hole, then used a few zip ties to secure the door’s bottom side.
Step 5: Lock the Door
You can use a rubber band and a piece of chain link to lock the trap door. The rubber band will loop itself through after passing through the door’s wire. Tighten the rubber band firmly. Attaching two of these did a great job of keeping the trap door closed. Simply stretch the rubber bands and hook them closed.
Step 6: Zip Tie Fingers
After that, we’ll create the zip-tie fingers that keep the caught crawfish in the trap. When the crawfish detect nothing restraining them within the trap, they will be able to escape quickly. Utilizing three zip ties, fasten them to the inside of the cone while directing them into the trap’s interior.
Step 7: Handle
You may make a handle for carrying the trap out of 5-1/5 inches of the chain by simply bending open the ends of each chain link and tightening them to the trap with needle-nose pliers in the top center of the trap. Before attaching, center your handle on the trap so that it won’t tilt over when being carried.
Step 8: Bait box
-
Your wire scraps can be used to create the box lid. 8×10 wire cells should be used. Cut the box body to the size of 32x16x8 cells. It will form an L shape.
-
Fold the box every eighth square. To make folding easier, you’ll need a straight edge of some kind. However, there will only be 5 sides because the lid is a distinct part. As required, zip the sides together, then cut the ties at their ends.
-
On the short side of the lid, fold over one row. It should be 8×8 in the center and have sides that are each one square wide. The box lid is locked with a rubber band. It should be firmly fixed.
-
Using the needle tip pliers, bend the spring ends to create hooks. Attach the springs to the trap’s center using hooks. The other end should also be hooked through the bait box’s cover. It should be positioned in the middle of the crawfish trap.
You are now an expert at making crawfish traps. Crawfish can be caught using many tactics and the Best places for fishing. The challenge is figuring out how to free the crawfish from their trap rather than catching them. There are traps available for purchase, but they can be costly. We hope that this guide will be sufficient to enable you to construct a unique crawfish trap on your own.