Bow hunting is difficult enough on its own. Still, the experience can be improved by making a bow using, as much as possible, the same resources, equipment, and methods that bowyers have used for centuries. These bows are easy to manufacture and extremely strong. Even though there are many wonderful bows on the market right now, in my experience no factory-made product can compare to the feel and appearance of a handmade bow.
Materials like wood from different trees, such as ash, hickory, cedar, oak, walnut, and birch, were used to make primitive bows. Native Americans often used accessible antlers and other bones from various animals to make bows. Among them were antlers from elk and caribou, mountain sheep horns, buffalo ribs and horns. This guide will show you how to expertly make your own bow, whether you’re an archer or a hunter who loves to use a unique, hand-forged weapon.
Step 1: Gather the materials
A list of suggested tools is provided below:
-
Hand axe
-
Wood glue
-
Pillar knife
-
Carpenter’s pencil
-
Wood rasp
-
Tape measure
-
Draw knife
-
Straight edge
-
Bow string
Step 2: Select wood wisely
Selecting the correct wood is the basis of any good bow. Hardwoods like hickory, oak, and maple should be used. Avoid using weaker woods like pine since you would need to use thicker sections, which would add weight and bulk to prevent breakage. For less cutting work, look for a diameter of at least eight inches. Bows are constructed from vertical slices of the tree; therefore, a smaller tree will have a more noticeable outside edge arc, which will require more trimming to smooth them.
Step 3: Cut down the tree
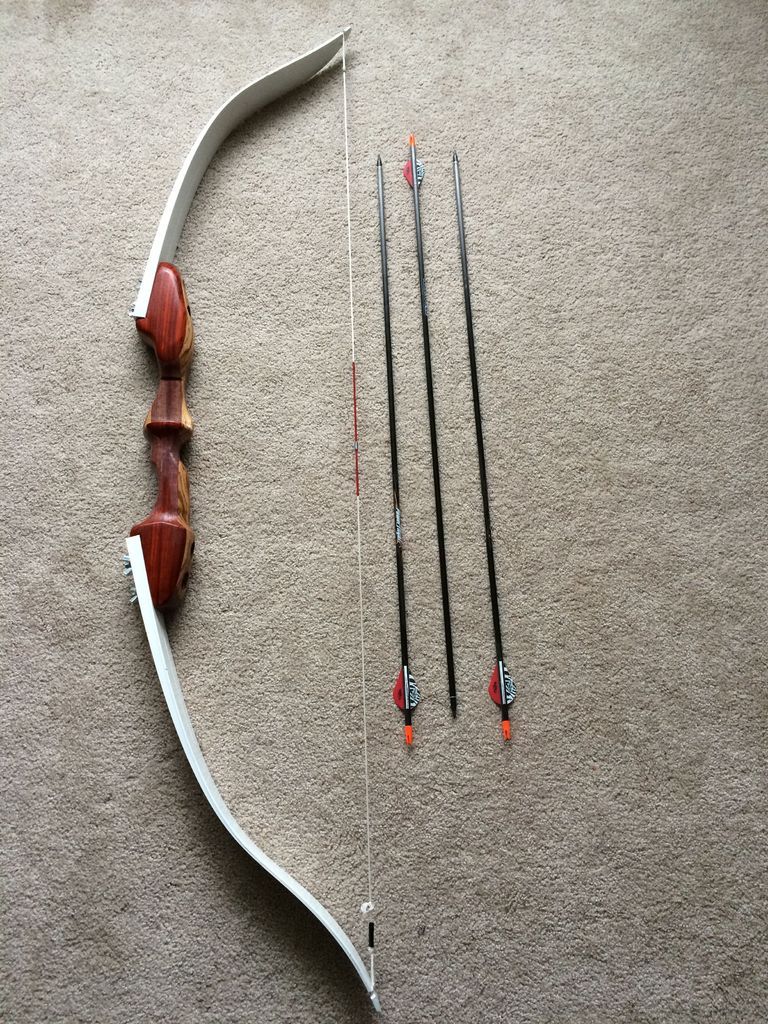
Six or seven bow staves can be made from an 8-inch tree. Allow 6 inches of space on each stave’s end so that you can cut away any areas of possibly cracked wood. For instance, a 6-foot piece of wood is required for a 68-inch bow. The stave should be 1 inch thick and 1 inch wide from tip to tip.
Step 4: Dry the wood out
Allow the wood to mature in a dry area for about six months so that it can dry out. If you want to be certain, purchase a moisture meter and wait for a reading of 11 or 12 percent. Wood with the greatest flexibility will deform into a bend known as a reflex. To prevent cracking while the wood dries, leave the bark on.
Step 5: Peel off the bark
The simplest way to remove bark is with a draw knife. A draw knife is a hand tool for woodworking that is great for roughing off corners and peeling bark. When using a draw knife, proceed with caution and consider using gloves to protect your hands.
Step 6: Examine the wood
Find the wood’s cleanest and straightest side that will meet the bow’s correct dimensions, which should be 68″ long. Look for strong parts that don’t exhibit any decay or weakness. Smoothing out wood is possible, but once it begins to rot, there is nothing you can do to avoid it. Once you’ve found an appropriate area, mark the area with a thick carpenter’s pencil.
Step 7: Shape the bow
Use a tactical knife to do the task. With a drawknife, trim the sides of the bow’s limbs by laying it flat. The grip portion of the center 5 inches should be 3/4 inch thick, decreasing to 1/2 inch at the ends. Use a wood rasp (which has tiny teeth and is designed to shape and smooth out the wood) to help in shaping the limbs to the proper thickness.
Step 8: Making the grooves
Make string grooves on the outside of both tips, approximately half an inch from each end, using a chainsaw file. The grooves should be 45 degrees off-center and about an inch deep. When using the bow, this will help to keep the string in place. Create additional slots on the lower limb for the bow stringer; a special string used to bend the bow before stringing it.
Step 9: Smooth the sharp edges
Any lumps or bits that are too thin to be used should be trimmed. The front and back surfaces should be sanded to remove sharp edges and points.
Step 10: Bend the limbs
After you’ve completed forming the bow, set the bow’s limbs on the ground and gently press with your foot in the center. You want to ensure that the limb bends uniformly. When exerting pressure, be careful and go softly. The bow should be bent but not broken, in order to test its flexibility. See if the bow can make a semi-circle.
If the wood won’t bend easily, remove more wood to make the limb weaker. You will need to start over with a fresh piece of wood if the front of the piece shows anything other than minor cracks.
Step 11: Find the lower limb
Reduce the length of the parachute rope to create a slight bow bend (5 inches between the bow center and the string). Pull the bow repeatedly while looking in a mirror to determine which side stays a little stiffer. It will be your lower limb that is stiffer. Once you’ve located it, use a sander to make a small groove for the arrow above the handle to the right or left, depending on which hand you shoot with.
Step 12: Polish the bow
Complete the bow with polishing. Due to the animals’ difficulty in seeing, hunters may want to apply a dark stain.
Step 13: Hook the bow
After the bow has been stained, allowed to dry and sealed, pull the 5 inches of the handle with hemp rope. Through the notches, tie a knot around each end. Bring the string down to the opposite side after tying off the first end. Make sure the string is tight enough to snap under pressure. Use a thin layer of glue and let it set.
Also Check: Best Hunting Arrows.